


- AllProduct Category
-
Medication Equipment Series
Sludge Treatment Series
Filter Series
Wastewater Treatment System
Water Purifier Line


详情描述
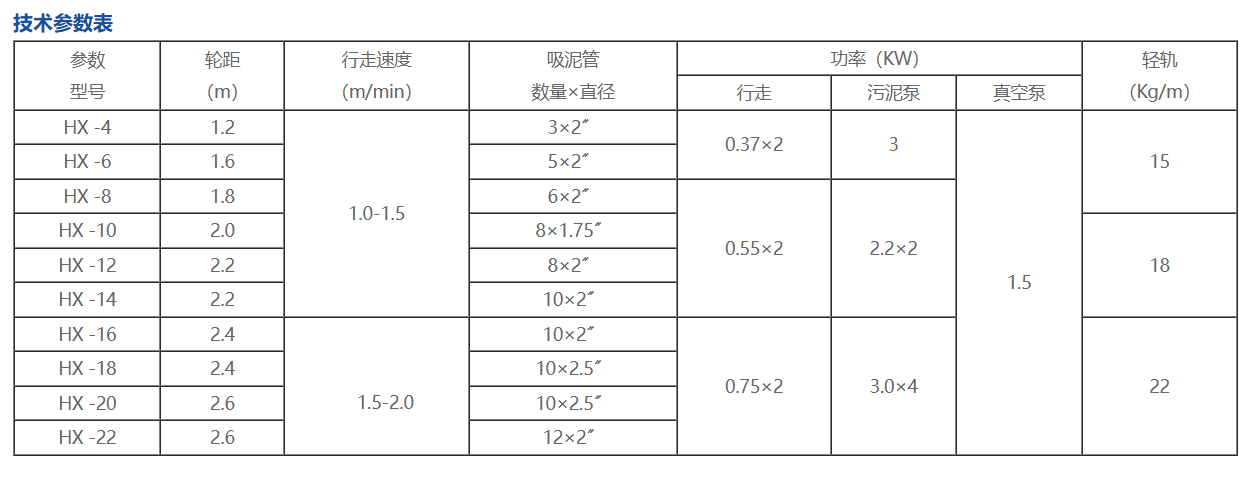
Drive-on Mud Sucker

Product Introduction
Walk-behind sludge scraper, used in wastewater treatment and waterworks plants for scraping settled sludge from the bottom of the pond into the pump suction mouth. It can continuously scrape and walk, then discharge the sludge out of the pond, alleviating the hassle of cleaning pond bottom sludge.
Key Features
1) This unit features a truss structure, significantly lighter than traditional designs. It is processed with hot-dipped galvanized anti-corrosion technique, ensuring no rust within 5 years. Components in contact with water are made of 304 stainless steel or Q235 carbon steel, greatly extending the service life.
2) Low maintenance, small power consumption, and low operating costs; pumps selected are reasonable, with smooth and reliable operation.
3) New-type transmission mechanism, eliminating walking errors at both ends.
4) The casters are made of steel, ensuring a long service life.
Structure and Principle
The drive-pump sludge removal machine consists of a working bridge, suction pipe, mud discharge pipe, submersible sludge pump, driving mechanism, electric control box, rail, sliding cable, or slider-type cable line, etc.
Installation
(1) Important Notes
To ensure the normal operation of the sludge pump, the four driving wheels must be installed on the two parallel sides of the rectangle. The track steel must be positioned on both sides of the rectangle and on the same horizontal plane.
(II) Installation Steps
1. Pre-buried iron tracks are reserved on the top sides of the horizontal flow pool walls, one meter apart. Each pre-buried iron piece has bolts and clamps installed at both ends for securing the steel rail.
2. Hoist the equipment onto the clarifier, place the four walking wheels on the steel rails, level according to the baseline, and check the installation dimensions.
3. Slide cable and electrical installation, using sliding contact cables, securing them at the longitudinal ends of the columns on the pool surface. Connect the main cable, power on for debugging the movement, install the travel switch and contact blocks, and install the anti-fall stopper based on the return position.
4. Conduct a trial run, ensuring the vehicle operates continuously for at least 8 hours after installation without interruption. Continuously check for any derailment during the run. In case of any discovery, stop the vehicle immediately and handle the situation to prevent the equipment from falling into the pool.
5. Install the sludge pump, placing it on the work bridge.
6. Suction and discharge pipe installation for mud removal, starting from the inlet of the mud pump and installing the pipes and suction nozzles downward from top to bottom, with a distance of 20-40mm from the suction nozzle to the bottom of the pond. The two mud pumps converge into a single discharge pipe to drain into the side sludge channel of the settling pond.
7. Connect the sludge pump power supply.
8. Perform water intake test on the pump. After the trial run is free of issues, fill the pool with water, ensuring the water level is 500mm above the sludge pump intake. Start the pump while filling the pool and observe the effluent condition at the sludge outlet.
Operation and Management
(1) The mud cleaner's parking position should be at the outlet end of the sedimentation pond. Before operation, close the siphon break valves on all mud suction pipes and proceed to the inlet end. Upon reaching the end of the inlet, automatically return to the original position at the outlet end and stop, completing the entire process of one mud suction.
(2) Sludge Pumping: Composed mainly of a pump, a mud suction nozzle, and a mud suction pipe. The sludge inside the suction pipe is discharged outside the pool through the pump's outlet pipe. The start of mud suction is manually operated, while reversing and stopping actions are completed by the trolley's travel switch, which is actuated by a rod on the track. The positioning of the rod on the track and the relative positions of the travel switches on the trolleys should be determined during installation.
(3) Sediment in the settling pond should not accumulate for too long; after 2 days, the sediment becomes quite dense. When removing the sediment, attention must be paid to the draining process. If blockage is detected, stop immediately and proceed only after the sediment drain is cleared. After 4 days, the sediment has solidified significantly. The pond bottom must be cleaned before using the sediment suction machine; otherwise, not only will sediment suction be impossible, but the resistance of the sediment can also deform the machine frame and damage the equipment.
(4) The pool should not be used until the ice has thawed or been broken up.
(5) Prevent bricks or other hard debris from falling into the pool to maintain a smooth bottom surface. This will prevent obstruction of the mud-suction nozzle and potential damage to it.